My first beginner telescope sat in its box for three weeks because I was scared of setting it up awry. When I eventually did, on a crisp October night in my vicinity, I set up Saturn’s rings within twenty twinkles and felt an inviting sense of wonder that authentically changed my relationship with the night sky ever.
Drink to this complete, no- gibberish companion on choosing and using a beginner telescope. Whether you’re a curious grown-up buying your first one, a parent shopping for a youthful stargazer, or someone who tried astronomy times agone and wants to give it another shot, this companion covers everything you need to feel confident from the first night out. No slang, no gatekeeping — just honest, experience- backed guidance on starting your astronomy trip the right way.
Find the perfect beginner telescope with expert advice on types, features, budgets, and first- night tips for every stargazer.
What Makes a Good Beginner Telescope Choice:
Not every telescope vended in stores or online qualifies as an authentically good beginner telescope, and this distinction matters tremendously because the wrong choice leads to frustration rather than wonder. A good beginner telescope balances four essential rates: optic quality that delivers clear, bright views; mechanical stability that holds your target steady without wobbling; ease of setup that does n’t bear a degree in engineering to figure out; and a price point that’s honest value without hidden negotiations.
Unfortunately, the astronomy request is littered with department store telescopes that promise the Moon — literally but deliver vague, frustrating views through shuddery mounts that collapse under their own weight. These toys in telescope apparel have turned innumerous enthusiastic newcomers down from astronomy permanently. An authentically good beginner telescope does n’t need to be precious. Numerous reputed beginner telescopes bring between one hundred fifty and four hundred bones and perform exceptionally well for times. What you’re paying for is optic glass quality, mount stability, and eyepiece quality — not ornamental features or emotional- sounding exaggeration figures published on the box.
Understanding these fundamentals before you buy is the single most important step in choosing a beginner telescope that you’ll actually enjoy using rather than returning within a month.
The Three Main Types of Beginner Telescope Explained:
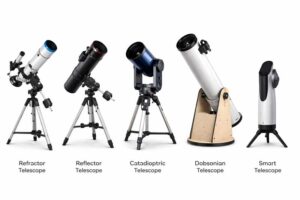
Every beginner telescope on the request falls into one of three optic designs, and understanding the differences between them helps you match the right tool to your specific interests and observing conditions. The first type is the refractor telescope, which uses a series of glass lenses inside a long tube to gather and concentrate light. Refractors produce crisp, high- discrepancy images with no inhibition in the light path and are excellent for viewing globes, the Moon, and double stars.
They bear nearly no conservation and hold their alignment indefinitely, making them a strong choice for a beginner telescope used by children or casual spectators. The alternate type is the glass telescope, which uses a twisted primary glass at the reverse of the tube and a small flat secondary glass near the front to concentrate light out through a side eyepiece.
Mirrors gather further light per bone than refractors and exceed at showing deep- sky objects like nebulae and worlds. The most popular beginner telescope glass design is the Dobsonian, which dyads a large glass with a simple, stable rustic rocker- box mount. The third type is the emulsion or catadioptric telescope, which combines lenses and glasses in a compact tube. These are largely protean but generally more precious and complex than utmost newcomers need originally. For most people starting out, a refractor or a Dobsonian glass is the practical choice.
Understanding orifice The Most Important Beginner Telescope Specification:
Aperture—the diameter of a telescope’s main lens or mirror—is its most critical spec. Often confused with magnification, aperture actually determines how much light the scope collects. A larger aperture reveals fainter stars, sharper planetary details, and distant galaxies. If you want clear views, always prioritize aperture size over magnifying power.
1: Why orifice Beats exaggeration Every Single Time
Of all the specifications published on a beginner telescope box, orifice is the bone
that matters utmost and exaggeration is the bone that matters least — yet most marketing leads newcomers to concentrate on exactly the wrong number. orifice refers to the periphery of the main light- gathering element, whether that’s the objective lens in a refractor or the primary glass in a glass.
A larger orifice collects further light, which translates directly into brighter images, sharper detail, and the capability to see fainter objects that lower orifices simply can not reveal. For a beginner telescope, an orifice of at least 70 mm for a refractor and at least 114 mm for a glass is the practical minimum worth buying. Telescopes with lower orifices than these thresholds can view the Moon and bright globes nicely, but they run out of capability snappily as you essay fainter targets. exaggeration, on the other hand, is n’t a fixed property of a telescope it depends entirely on which eyepiece you attach.
High exaggeration without sufficient orifice to support it produces dim, vague images that look worse than moderate exaggeration through a quality optic system. The expression educated astronomers use is that a telescope is an orifice collector first and everything additional second. When assessing any beginner telescope, find the orifice specification first, confirm it meets the minimums, and only also consider other features like mount type and included accessories.
Telescope Mounts for newcomers Alt- Az vs Equatorial:
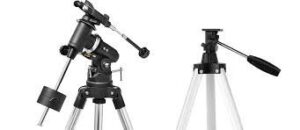
The mount is the mechanical foundation of any beginner telescope, and choosing the right mount type makes the difference between a pleasurable session and a frustrating wrestling match with your outfit. Two main mount types are applicable for newcomers: the altitude- azimuth mount, widely called the alt- az, and the tropical mount.
An alt- az mount moves in two simple directions — over and down for altitude, and left and right for azimuth. This shows how your eyes naturally overlook the sky, making an alt- az mounted beginner telescope incontinently intuitive for anyone to use without previous training. You point it roughly where you want to look, fine- tune with the slow- stir controls, and you’re done.
The Dobsonian mount, cherished by beginner glass possessors, is basically a heavy- duty alt- az design erected from wood or essence that provides exceptional stability at veritably low cost. An tropical mount is designed elsewhere — it aligns one axis parallel to Earth’s gyration axis, which allows you to track stars by turning just a single clump as Earth spins. This shadowing capability is authentically useful for long- duration viewing sessions and astrophotography.
Still, tropical mounts bear polar alignment to work duly, which adds a setup step that can authentically confuse absolute newcomers. For your first beginner telescope, an alt- az or Dobsonian mount nearly always results in a better experience than starting with a tropical, unless you have a patient tutor who can walk you through polar alignment from the morning.
Stylish beginner Telescope Options by Budget Range:
Choosing a beginner telescope at the right budget means understanding what each price league really delivers and what compromises you’re accepting. Then’s an honest breakdown to guide your buying decision:
- Under$ 150 — This range contains substantially 60 mm to 70 mm refractors and 114 mm entry- position mirrors. Anticipate decent lunar and planetary views but limited deep- sky capability. A 70 mm refractor like the Celestron Travel Scope or an Orion StarBlast 114 mm glass represent the stylish value at this league. Avoid any telescope in this range that advertises exaggerations above 200x — that number is a red flag for low optic quality.
- 150 to$ 300 — This is the sweet spot for a first serious beginner telescope. Quality 80 mm refractors, 130 mm mirrors, and small Dobsonians sit comfortably then. The Sky- Watcher 130 mm on an EQ mount, the Orion SpaceProbe 130 mm, and the Celestron AstroMaster 130EQ all deliver authentically satisfying views of globes, star clusters, and bright nebulae within this budget.
- 300 to$ 500 — At this position you pierce quality 6- inch Dobsonians and 102 mm apochromatic refractors. These beginner telescope options are basically entry- position instruments that can grow with your chops over numerous times without demanding relief.
- 500 and above — Motorized GoTo mounts and 8- inch Dobsonians live then. A motorized beginner telescope in this range automates changing objects, which is a genuine advantage for intolerant newcomers willing to invest in convenience.
New versus habituated — A used beginner telescope from an estimable dealer on astro forums frequently gives significantly further optic quality per bone
than a new outfit at the same price, and the astronomy community is generally honest and helpful in classifying used gear directly.
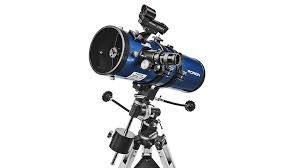
Top Beginner Telescope Recommendations for 2025:
For 2025, the Apertura AD8 remains the champion for visual stargazers, offering a massive eight-inch mirror that makes deep-sky targets pop. If you are short on space, the Sky-Watcher Heritage 150P packs great power into a portable tabletop design. For astrophotography beginners, the all-in-one ZWO Seestar S50 smart scope is unbeatable.
1: Matching the Right compass to Your Sky and pretensions
With so numerous options on the request, specific recommendations help newcomers cut through the noise and feel confident in their final choice. The Celestron NexStar 5SE is extensively considered the standard motorized beginner telescope for those who want hands- off object finding. Its 5- inch Schmidt- Cassegrain optics deliver excellent planetary and deep- sky views, and the single- arm GoTo mount aligns itself using just three bright stars after a short estimation.
For pure visual observing on a generous but not extravagant budget, the Sky- Watcher 6- inch Dobsonian is the most constantly recommended beginner telescope among educated amateur astronomers. Its 150 mm glass gathers enough light to reveal hundreds of deep- sky objects from suburban skies, and its simple rocker- box mount requires zero alignment and zero specialized knowledge to operate. For children specifically, the Orion FunScope 76 mm tabletop Dobsonian is a fascinating, authentically functional beginner telescope that fits on any flat face and survives enthusiastic youthful hands.
The Celestron Astro- Fi 102 mm is excellent for newcomers who want Wi- Fi smartphone control without committing to a full motorized mount cost. For anyone prioritizing crisp planetary and lunar views in a compact trip-friendly format, the Sky- Watcher Evostar 80ED apochromatic refractor is a step above typical beginner instruments but accessible enough in price that committed newcomers happily choose it as their first serious compass.
How to Set Up Your Beginner Telescope rightly:
Setting up a beginner telescope right the first time prevents the single most common beginner mistake, which is going outdoors on a perfect clear night and spending the entire time fighting involving tripod legs and missing finder reaches rather than actually looking at the sky. Begin your setup indoors in daylight, well before your intended observing session.
Read the instruction primer from launch to finish before touching a single element — beginner telescope primers are generally short and the ten twinkles spent reading prevents hours of confusion. Assemble the tripod and mount first, icing all locking bolts are snug but not overtightened, which can strip vestments on aluminum bodies. Attach the optic tube using the dovetail rail or rings as specified, also install the finder compass using the type handed.
The finder compass alignment step trips up more newcomers than any other part of the setup. To align the finder, point your beginner telescope at a distant day object — a rooftop, a mileage pole, anything at least a quarter afar down — center it precisely in your main eyepiece using your smallest- power eyepiece first, also acclimate the finder compass’s alignment screws until that same object appears precisely centered in the finder’s crosshairs or red fleck.
This alignment takes three twinkles and saves enormous frustration under the night sky. Before your first night session, let the telescope sit outdoors for thirty to forty- five twinkles to reach the ambient out-of-door temperature. This thermal balance step dramatically improves image sharpness by barring the internal air currents that form when optics are warmer than the girding air
What Can You Actually See With a Beginner Telescope:
The honest answer to this question is authentically instigative, because a good beginner telescope shows far further than most people anticipate before they start. The Moon is the single most spectacular target for any beginner telescope, and you can spend entire sessions exploring its terrain without ever exhausting the detail available.
Craters, mountain ranges, lava- swamped plains called maria, and the sharp shadow lines along the terminator — the day- night boundary — produce endlessly intriguing geographies that change appearance every night as the lunar phase shifts.
The globes offer some of the most satisfying beginner telescope moments imaginable. Jupiter shows its pall bands and the four Galilean moons lined up like bitsy stars alongside the earth, changing their relative positions noticeably from one night to the coming. Saturn reveals its rings as a distinct separate structure from the earth’s fragment, an image so suddenly beautiful that first- time observers frequently assume commodity is wrong with their eye. Mars shows its sanguine color and a polar ice cap during favorable resistances.
Venus goes through phases like the Moon and can be dramatic in twilight. Deep- sky objects, the collaborative name for nebulae, worlds, and star clusters outside our solar system — come accessible as orifice increases. Indeed an introductory beginner telescope shows the Orion Nebula as a glowing pall with the four Trapezium stars bedded within it, the Pleiades cluster as a spangling jewel box, and the Andromeda Galaxy as a faint but unmistakably real smirch of light that represents two trillion stars over two million light- times down.
Eyepieces and Accessories Every Beginner Telescope Needs:
| Accessory | Purpose | Priority Level |
| 25mm eyepiece | Wide-field low magnification viewing | Essential — usually included |
| 10mm eyepiece | Medium magnification for planets | High — upgrade priority one |
| 2x Barlow lens | Doubles magnification of any eyepiece | High — great value addition |
| Red flashlight | Preserve dark adaptation while reading charts | Essential — buy immediately |
| Moon filter | Reduce glare for comfortable lunar viewing | Medium — useful from night one |
| Star diagonal | Comfortable viewing angle for refractors | Essential for refractor users |
| Planisphere | Rotating star chart for sky orientation | Recommended for all beginners |
| Dew shield | Prevents lens fogging in humid conditions | Situational — depends on climate |
Stylish Observing Targets for Beginner Telescope Owners:
Choosing the right targets for your beginner telescope experience is just as important as choosing the right outfit. Starting with objects that are too faint or too small for your orifice leads to disappointment, while starting with the brightest, most satisfying objects builds confidence and enthusiasm that keeps you coming back.
The Moon should be your dereliction target for the first several sessions — it rewards you incontinently with detail and requires no dark adaptation or star map knowledge. formerly comfortable tracking the Moon, moving to Jupiter, which is visible from Earth for several months each time and shows its barred pall structure indeed in small beginner telescopes.
Saturn should be your alternate planetary corner, because the first time you see those rings distinctly separated from the fragment is an authentically memorable astronomy moment that no snap completely captures. For deep- sky objects, start with the brightest and largest exemplifications — the Orion Nebula in downtime skies, the Hercules Globular Cluster in summer, the Beehive Cluster in spring, and the Double Cluster in Perseus through afterlife and downtime.
Double stars are uncredited beginner telescope targets — unyoking a close double star into two distinct points requires optic quality and steady seeing, and a successful split gives you a clean, satisfying sense of achievement. Albireo in Cygnus is particularly cherished for its striking gold and blue color discrepancy indeed in modest orifices.
Light Pollution and Beginner Telescope Performance:
Light pollution is the single biggest environmental challenge facing beginner telescope possessors in the United States, where most people live in cities or metropolises where the sky background nowadays gets truly dark.
Understanding how light pollution affects your beginner telescope experience helps you manage prospects and find practical workarounds.
From a heavily light- weakened civic sky, roughly Bortle 8 or 9 on the standard scale, your beginner telescope will give excellent views of the Moon, all visible globes, and bright double stars. Bright star clusters like the Pleiades still look beautiful. But deep- sky objects, the nebulae and worlds that photos make look spectacular — will be delicate or insolvable to see because their faint light is swamped by the bright sky background.
Moving indeed thirty or forty long hauls outside a major megacity to a suburban- pastoral transition zone, Bortle 5 or 6, makes an enormous practical difference for your beginner telescope deep- sky experience. The Orion Nebula jumps out obviously. Spherical clusters resolve into individual stars rather than fuzzy blobs.
The Andromeda Galaxy becomes unmistakably real. Apps like Light Pollution Map and Clear Outside help you find the nearest nicely dark sky point from your home. Indeed yearly passages to darker skies condense your regular vicinity sessions and give your beginner telescope a chance to show you what it can authentically do when the sky cooperates completely.
Common Beginner Telescope miscalculations and How to Avoid Them:
Many beginners mistakenly prioritize high magnification over aperture, resulting in blurry, disappointing views. Another frequent error is buying a flimsy mount that shakes with every breeze. To avoid these traps, invest in a sturdy tripod setup and focus on a telescope’s light-gathering power rather than its advertised zoom numbers.
1: The utmost repairable Problems New Telescope Owners Face
Experience tutoring new astronomers reveals a harmonious set of miscalculations that newcomers make constantly, all of which are entirely avoidable with a little prescience. The most common mistake is starting with too important an exaggeration. newcomers artificially reach for their shortest, highest- power eyepiece first, not realizing that high exaggeration amplifies atmospheric turbulence, reduces image brilliance, and shrinks the field of view — making targets nearly insolvable to find.
Always start every beginner telescope session with your smallest- power, widest- field eyepiece, also switch to advanced exaggeration only after the target is comfortably centered. The alternate major mistake is n’t allowing thermal balance time.
A telescope moved directly from a warm house to cold out-of-door air is full of internal temperature slants that produce shimmering heat deformation in every image. The third mistake is skipping star map literacy. Numerous newcomers calculate entirely on phone apps to tell them where to point without ever developing introductory sky knowledge.
Learning fifteen to twenty major constellations and the brightest stars through those constellations gives you an internal chart of the sky that makes every beginner telescope session more productive and tête-à-tête satisfying. The fourth mistake is trying astrophotography before learning visual observation.
Astrophotography introduces a fully separate subcaste of specialized complexity that authentically overwhelms utmost newcomers when combined with the formerly new experience of visual telescope use. Spend at least a full season enjoying visual observing before adding a camera to your beginner telescope setup.
Maintaining and minding for Your Beginner Telescope:
Proper care of a beginner telescope is n’t complicated, but many harmonious habits cover your investment and keep the optics performing at their stylish best for numerous times. The most important rule is to no way touch the glass shells of lenses or glasses with your fritters.
Skin canvases are extremely delicate to remove from optic shells without threat of scratching the delicate coatings, and point impurity degrades discrepancy and sharpness noticeably. However, repel the appetite to wipe it incontinently, If your beginner telescope glass or lens accumulates dust.
A small quantum of dust on an objective glass or lens has nearly no measurable effect on image quality — the scattering it causes is negligible compared to the benefit of not risking a scrape by drawing unnecessarily. When drawing is authentically necessary, use a bulb cracker
to remove loose patches first, also use a devoted optic cleaning result and lens towel in an indirect stir with the lightest possible pressure. Store your beginner telescope in a dry position down from temperature axes when not in use. Rapid temperature cycling causes glass coatings to degrade briskly and can stress cemented lens rudiments in refractors over time.
For mirrors, the primary glass will ultimately need recoating after numerous times of use, generally ten to fifteen times under normal storehouse conditions. Keep lens caps on all optic shells during storehouse and transport. An introductory padded bag for your beginner telescope extends its functional life vastly, especially if you transport it regularly to dark- sky observing spots.
Expert Tips for Using a Beginner Telescope Successfully:
Getting authentically good results from a beginner telescope every time you go out comes down to developing smart habits and small rituals that astronomers take for granted but newcomers infrequently hear about explicitly:
- Plan your observing session in advance using free software like Stellarium or SkySafari. Knowing exactly which objects are well- placed in the sky on the night you plan to observe prevents the frustrating experience of going outdoors without a target list and spending the session aimlessly searching a strange sky.
- Start every beginner telescope session on the Moon or a bright earth to confirm your optics and collimation are performing rightly before moving to fainter targets that bear perfect optic alignment to show well.
- Give your eyes a genuine dark adaption period of at least twenty twinkles before trying any deep- sky targets. Mortal eyes come roughly one thousand times more sensitive to faint light over this adaptation period, and the difference in what you can see with a completely dark- acclimated eye versus an unused bone is dramatic.
- Keep an observing journal recording what you saw, what exaggeration worked stylishly, and what sky conditions were like each session. Reviewing once notes before a new session is unexpectedly motivating and helps you understand which nights and seasons favor which targets with your specific beginner telescope setup.
- Join your original astronomy club before buying precious accessories. U utmost clubs host regular star parties where educated members bring a wide variety of telescopes, giving you the chance to look through different instruments and get particular advice about accessories specifically suited to your beginner telescope model.
Astrophotography Basics With a Beginner Telescope:
Once you have spent a season or further enjoying visual observing, adding astrophotography to your beginner telescope experience opens an entirely new creative dimension. Lunar and planetary photography is the most accessible starting point because it requires no special shadowing outfit and uses your telescope without revision.
Point your beginner telescope at the Moon or Jupiter, hold a smartphone camera up to the eyepiece, and tap the screen to concentrate — this fashion, called afocal photography, produces unexpectedly good results with zero fresh outfit. For further serious astrophotography, a devoted astronomy camera or a mirrorless camera body with a T- ring appendage attaches directly to your beginner telescope focuser in place of an eyepiece.
Deep- sky astrophotography with long exposures requires a shadowing equatorial mount to help stars from running as Earth rotates, which is why most serious astrophotographers ultimately upgrade from their original alt- az beginner telescope mount to a tropical platform. Freepost-processing software like GIMP and Siril handles introductory astronomical image processing on any computer without subscription freights. Starting astrophotography with lunar and planetary targets builds the chops and tolerance demanded for deep- sky work without the complexity and cost that deep- sky imaging introduces incontinently.
FAQ’s:
Q1: What’s the stylish beginner telescope under$ 200?
The Sky- Watcher 130 mm glass and the Celestron AstroMaster 70AZ refractor both deliver excellent value under$ 200, offering clear views of globes, the Moon, and bright deep- sky objects without optic negotiations.
Q2: Is a refractor or glass better for a beginner telescope?
Both work well. Refractors need no conservation and suit planetary viewing. Mirrors offer further orifice per bone and exceed deep- sky objects. Dobsonian mirrors are extensively recommended as the stylish value beginner telescope overall.
Q3: What exaggeration does a beginner telescope need?
For utmost beginner telescope use, exaggerations between 50x and 150x cover nearly every worthwhile target. Advanced exaggeration requires impeccably steady air and veritably good optics to be usable and is infrequently the limiting factor newcomers suppose it is.
Q4: Can a beginner telescope see worlds?
Yes, with realistic prospects. A 114 mm or larger beginner telescope can show the Andromeda Galaxy, the Whirlpool Galaxy, and the Leo Triplet as faint but real smirches of light. Dark skies ameliorate results dramatically compared to suburban viewing.
Q5: How long does it take to learn to use a beginner telescope?
Introductory comfort with setup and changing bright objects like the Moon and Jupiter generally comes within two or three sessions. Comfortable deep- sky navigation generally develops over a full season of regular use combined with some star map study.
Conclusion:
A beginner telescope done right is one of the most satisfying purchases you’ll ever make. It opens a particular relationship with the macrocosm that grows richer with every clear night. Start with realistic prospects, choose an outfit matched to your budget and observing conditions, and give yourself time to learn the sky gradationally. Every educated astronomer moment was formerly a complete beginner who bought their first compass and stood outside gaping up in wonder. That trip starts with one good beginner telescope and one clear night.