I took my first moon Photos at 2 AM on a cold rooftop, my hands pulsing. The first shot was pure white — fully overexposed. But my third attempt revealed every crater in stunning clarity, and I’ve been completely hooked on lunar photography ever since that magical night.One single sharp and stunning night sky image taken tonight could fully and permanently transfigure the way you see the sky.
Moon Photos let anyone capture the beauty of the macrocosm from their vicinity. With the right fashion, taking stirring lunar shots is far easier than most people imagine and endlessly satisfying.
Master lunar images with expert tips on camera settings, composition, timing, and editing. Your ultimate companion to taking stunning shots starts then.
Why elysian photography Are Worth Taking
Moon Photos are among the most popular and emotionally important images in all of photography — and for veritably good reason. The Moon Photos is Earth’s closest elysian neighbor, near enough that indeed introductory camera outfit can reveal its craters, ancient lava plains, and mountain ranges in extraordinary detail.
Unlike deep- space photography — which demands precious technical gear and complex processing — night sky captures are accessible to nearly anyone. A smartphone, a freshman DSLR, or a consumer drone camera can all produce remarkable moon Photos when paired with the right ways and a little planning.
There’s also an emotional dimension to these images that no other form of astrophotography relatively matches. When you capture the Moon Photos rising above a mountain or glowing over still water, you’re shooting the same light that has illuminated every human being who has ever lived. That connection to ancient and universal commodities is precisely why lunar captures continue to be participated, celebrated, and treasured by millions of people around the world.
Understanding Lunar Phases for Better Moon Photos
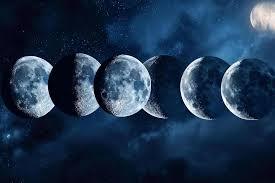
The single most important piece of knowledge for anyone wanting to ameliorate their astrophotography is understanding how the Moon’s phase affects the quality and character of each image.
Full the lunar image
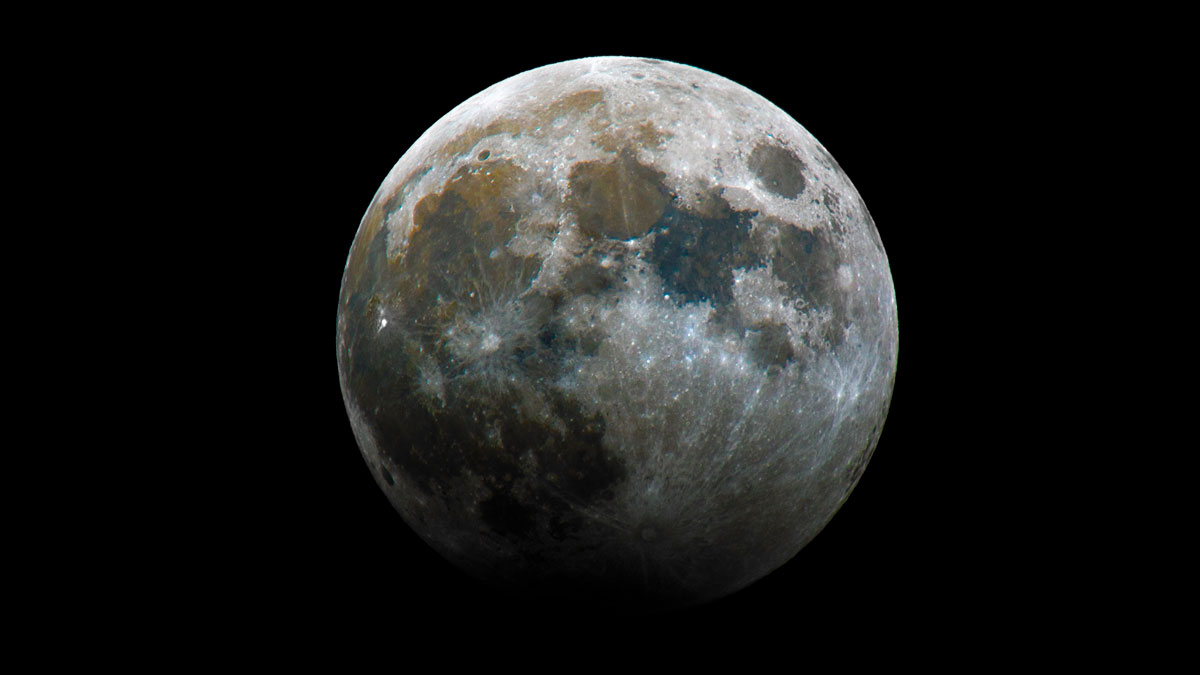
The full moon Photos is the most popular subject for moon Photos and understandably so. Its complete, brilliant illumination makes it visually dramatic and easy to find in the sky. Still, full moon night photography tends to show fairly flat lighting, because sun strikes the lunar face nearly straight- on, creating minimum murk.
For these captures that emphasize the Moon’s size and brilliance, the full moon Photos is ideal. For moon Photos that reveal face texture and three- dimensional detail, other phases offer further compelling results.
Quarter sky photography
The quarter moon Photos phases first and last quarter — produce some of the most textured and dramatic lunar shots for face detail. During these phases, the sun strikes the Moon at a steep angle, casting long murk that reveal the relief of craters and mountain ranges in stirring clarity.
The terminator — the boundary line between the Moon’s illuminated and dark sides is the most dramatic point in quarter- phase moon Photos. The play of light and shadow along the terminator reveals the Moon’s three- dimensional geography more vividly than any other phase.
Crescent this photography
Crescent night sky shots present a different creative occasion. The thin splinter of the crescent combined with the ghostly gleam of Earthshine — sun reflecting off Earth onto the Moon’s dark side — creates a hauntingly beautiful image that’s relatively different from any other lunar phase. Crescent moon Photosbear longer exposures and benefit tremendously from intriguing focus compositions.
Essential outfit for these photos
You do n’t need a professional setup to take stunning lunar photography but understanding what different tools offer helps you make the utmost of what you formerly have.
Smartphones for Moon Photos
ultramodern smartphones have come authentically able tools for sky captures. Using the phone’s maximum optic drone, switching to Pro or Homemade mode, and telephoning down the exposure compensation will help the overexposed white fragment that pestilences so numerous freshman smartphone lunar images.
The single most important accessory for smartphone moon Photosis a compact tripod or clamp. Camera shake is the primary adversary of sharp shots at any position, and indeed the subtle earthquake of a hand- held shot can reduce a potentially excellent image to an inferior blur.
DSLR and Mirrorless Cameras for Moon Photos
DSLR and mirrorless cameras offer the topmost versatility for lunar photography. With full homemade control over exposure, exchangeable lenses, and larger detectors able to land in fine detail, these cameras can produce extraordinary lunar images.
A blowup lens of 300 mm to 600 mm is ideal for frame- filling night sky images that reveal face detail. Numerous educated shutterbugs add a 2x teleconverter to their setup — effectively doubling their focal length and producing indeed more detailed moon Photos without the cost of a longer lens.
Telescopes and Advanced lunar shots
For the most detailed Elysian photography possible, attaching a camera directly to a telescope opens a fully different position of lunar imaging. Indeed a modest freshman telescope can produce moon Photosthat reveal features just a many kilometers across on the lunar face — images that compete with professional overlook photography in their position of detail and clarity.
Camera Settings The Complete Guide
Getting the exposure right is the most critical specialized factor in successful night sky captures. The Moon Photos is dramatically brighter than most people anticipate — particularly when full — and overexposure is the most common mistake in these images.
Recommended Settings Table
| Moon Phase | Aperture | Shutter Speed | ISO | Notes |
| Full Moon | f/11 | 1/125s | 100 | Looney 11 starting point |
| Gibbous Moon | f/8 | 1/125s | 100 | Slightly more shadow detail |
| Quarter Moon | f/5.6 | 1/60s | 200 | Best for crater texture |
| Crescent Moon | f/4 | 1/30s | 400 | Include foreground interest |
| Lunar Eclipse | f/4 | 2–4 sec | 800–1600 | Blood moon coloring |
Focus for Sharp astrophotography
Homemade focus is essential for constantly sharp moon Photos . Autofocus systems constantly struggle with the Moon Photos against a dark sky, hunting back and forth and producing frustratingly vague lunar images. Switch to homemade focus, zoom into the Moon Photos on your camera’s live view screen, and acclimate until the lunar craters appear impeccably crisp before shooting.
Always use a tripod and a remote shutter release or tone- timekeeper. Indeed pressing the shutter button with your cutlet introduces vibration that softens detail in otherwise excellent night photography.
Composition ways for Stunning Moon Photos
Specialized settings produce a rightly exposed Moon Photos but thoughtful composition is what elevates these captures from technically acceptable to authentically beautiful.
Focus rudiments
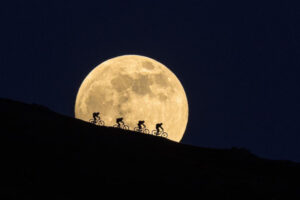
The most visually important sky photography includes compelling focus subjects that give the image scale, environment, and emotional resonance. A megacity skyline glowing under a rising Moon Photos , a lone tree silhouetted against the lunar fragment, a mountain crest catching tableware light — these compositional choices are what separate truly memorable moon prints from simple shots.
To plan focus alignments for your lunar shots, use photography planning apps similar as PhotoPills or The shooter’s Ephemeris. These tools show exactly where the Moon Photos will rise and set on any future date from any position, allowing precise alignment of the Moon Photos with your chosen focus subject.
Water Reflections
Still water offers some of the most stunning compositional openings for moon Photos. An impeccably calm lake, swash, or indeed a rain- filled billabong
can double the visual impact of the Moon Photos in the frame — creating dramatic symmetrical compositions that are both scientifically intriguing and deeply atmospheric. The stylish reflections in this photograph are captured in fully still conditions, shortly after the wind drops.
Eclipse Photography
Lunar eclipses — Blood Moons — represent the rarest and most spectacular openings for night sky shots. As Earth’s shadow covers the Moon, it transforms from brilliant tableware to a deep coppery red — bone
of the most dramatic color metamorphoses in all of nature. decline moon prints bear longer exposures than standard full moon shots, but the performing images are among the most extraordinary in lunar photography.
Planning Your Moon prints Sessions
The shutterbugs who constantly capture the stylish moon prints are n’t simply lucky; they plan precisely, prepare completely, and shoot with clear intention. Robotic lunar images can sometimes be beautiful, but the most important and memorable shots nearly always come from sessions where the shooter knew in advance exactly when the Moon would rise, where it would appear in the sky, how it would align with a chosen focus, and what phase it would be in
. Planning turns a good shooter into a great one, and nowhere is that further true than in this craft. Before you indeed pick up your camera, invest time in understanding the Moon’s movements, the original geography, and the atmospheric conditions read for your chosen night. That medication pays tips in every single frame you capture.
The two most important planning tools available for serious moon prints are PhotoPills and The shooter’s Ephemeris. PhotoPills is a stoked reality app that allows you to point your phone at any geography and see exactly where the Moon will rise, where it’ll travel across the sky, and at what size it’ll appear on any future date from any position on Earth. This makes it inestimable forpre-visualizing lunar compositions before ever visiting a position you can skewer a mountain, a megacity skyline, or a littoral precipice from your living room and know precisely where to stand on the night of the shoot.
The shooter’s Ephemeris complements this by furnishing detailed desktop and mobile charts of moonrise and moonset directions, allowing you to plan the precise angle of approach for focus- aligned lunar shots weeks or months in advance. Together, these two tools exclude guesswork and replace it with confident, purposeful creative planning.
Weather and atmospheric conditions are the final critical factor in planning successful moon prints, and they earn far further attention than utmost newcomers give them. Indeed perfect camera settings and indefectible composition can not save lunar images taken through thick pall cover, hazy atmospheric humidity, or air defiled with dust and particulates. Use devoted astronomy rainfall apps similar as Clear Outside or Clear Dark Sky to assess atmospheric translucency — a dimension of how easily light peregrination through the atmosphere on a given night — ahead committing to a firing session.
These apps give hourly vaccinations of pall cover, moisture, translucency, and astronomical seeing conditions, giving you the information you need to choose the clearest possible nights for your lunar work. In addition, track forthcoming full moons, supermoons, and total lunar declines well in advance using a devoted Moon Phase timetable app — because the rarest and most spectacular openings for moon prints award the shutterbugs who see them coming and prepare consequently, not those who discover them too late.
Post-Processing these shots
Indeed impeccably captured lunar photography benefit from carefulpost-processing. The thing is n’t to alter reality but to reveal the full detail and atmosphere that the camera captured but did n’t completely render straight out of the camera.
In Lightroom or Adobe Camera Raw, begin by pulling down the highlights and white sliders to recover any blown- out areas of the lunar face. Increase clarity and texture to reveal face detail. Applying stropping precisely — too important — creates an artificial look in moon prints, while the right quantum brings the genuine texture of the lunar regolith to life with remarkable literalism.
For compound night sky images where the Moon and geography are mugged independently and combined in post — pay close attention to matching light direction, apparent Moon size, and color temperature. The most satisfying compound lunar shots feel fully natural because every element was captured under authentically analogous conditions.
Conclusion
lunar photography are one of photography’s most accessible and satisfying hobbies — open to anyone with a camera, a clear sky, and the amenability to stay up a little once night. The Moon has been mugged innumerous times, yet it noway stops offering commodity new a different phase, a different focus, a different quality of light. Every night it rises is another assignation to produce an image that captures commodity real and beautiful about the macrocosm we live in. Step outdoors tonight, point your camera overhead, and take your stylish this photography yet — the sky is ready when you are.
Constantly Asked Questions
Q What’s the stylish camera for moon prints?
Any camera with homemade exposure control and the capability to use a blowup lens can produce excellent elysian photography. A DSLR or mirrorless camera with a 300 – 600 mm lens is ideal, but emotional night sky captures are also possible with ultramodern smartphones equipped with optic drone and mounted on a tripod.
Q Why do my moon prints always look pure white?
Overexposure is the most common problem in freshman these images. The Moon is far brighter than the dark sky girding it, and cameras set to bus will dramatically stereotype the lunar face. Use homemade settings — f/ 11, 1/ 125s, ISO 100 for a full moon — to capture lunar captures with genuine face detail.
Q When is the stylish time to shoot the Moon?
Moonrise and moonset offer the most dramatic compositional openings for astrophotography, especially when the Moon can be framed against intriguing focus subjects. For face detail and texture, quarter- moon phases give the most dramatic lighting along the terminator line.
Q Do I really need a tripod?
Yes a tripod is absolutely essential for sharp lunar shots. Indeed at fast shutter pets, hand- held camera movement introduces subtle blur that destroys lunar face detail. A tripod combined with a remote shutter release constantly produces the sharpest possible the lunar image at every focal length.
Q How do I make the Moon look bigger in prints?
Use the longest blowup lens available — 300 mm minimum, 600 mm or further for frame- filling night photography. Alternately, place yourself far from a focus subject and use a long lens to compress apparent distance, making both the focus and the Moon appear large within the same frame.
Summary
This composition explored moon prints from every possible angle — covering everything a shooter needs to go from complete freshman to confident lunar artist. We began with the wisdom of the Moon’s phases, explaining why the full moon produces brilliant but flat lighting, why quarter- moon phases reveal dramatic face texture through the terminator shadow, and why crescent phases open unique creative openings through Earthshine. We also explored the full range of outfit — from ultramodern smartphones with optic drone and tripod mounts, to DSLR and mirrorless cameras paired with 300 – 600 mm blowup lenses, to telescopes able of producing frame- filling lunar detail that rivals professional overlook imagery.
Camera settings were covered in depth through the Looney 11 rule — the essential starting- point exposure frame for full moon conditions — alongside a complete phase- by- phase settings table covering orifice, shutter speed, and ISO from full moon all the way through total lunar decline. Throughout every section, the communication was harmonious the specialized foundation of great lunar work is erected on homemade focus, a stable tripod, a remote shutter release, and the tolerance to acclimate until every crater appears razor-sharp on your live view screen before you take a single frame.
The alternate half of this companion concentrated on the creative and strategic confines of lunar photography that separate technically correct images from authentically important bones Composition is where lunar photography becomes art — and we covered three transformative approaches in depth focus rudiments that give the Moon scale and mortal environment, water reflections that double the visual drama through perfect harmony, and the extraordinary occasion of lunar decline photography that turns the Moon blood-red and demands everything a shooter has learned be brought to bear in a single rare night.
Planning tools PhotoPills, The Photographer’s Ephemeris, and atmospheric translucency foretellers like Clear Outside — were presented not as voluntary extras but as essential creative instruments that allow shutterbugs topre-visualize, rehearse, and execute their shots with the confidence that only thorough medication provides.
Post-processing in Lightroom or Adobe Camera Raw was addressed actually it is n’t about fabricating beauty but about revealing the beauty the camera captured and needs help expressing — through careful highlight recovery, clarity and texture adaptations, precise stropping, and the nuanced craft of credible compound construction. Every skill in this companion composites on the others, and together they form a complete system for landing these images that are n’t just technically emotional but emotionally reverberative, visually memorable, and good of the extraordinary subject they represent.