My daughter came home from school last week with a space project. She needed to draw Saturn planet by Friday, and her confidence was at zero. We spent three hours that night, and what started as frustration turned into something beautiful—and taught me everything I’m sharing with you today.
To draw Saturn planet, start with a slightly flattened circle and add wide elliptical rings around it. Use light pencil lines, simple shading, and a small gap for the Cassini Division to make your draw Saturn planet look realistic. This easy method helps beginners draw Saturn planet quickly for school projects or practice.
Learn how to draw Saturn planet easily with 5 simple steps. This guide helps beginners create a beautiful Saturn planet sketch quickly.
Five Essential Steps to Draw Saturn Planet Perfectly Every Time
Most people approach Saturn the wrong way. They start with the rings and hope the planet fits.
I’ve been teaching art workshops for over a decade, and Saturn requests come up constantly. Kids love it. Adults request it for space-themed rooms. Tattoo artists ask for reference guides.
The problem? Everyone makes the same mistakes.
Here’s what you need to know when you draw Saturn planet:
- The planet is a flattened sphere, not a perfect circle
- The rings have specific angles based on your viewing perspective
- Ring shadows create depth and realism
- Color matters more than you think
- The ring gap (Cassini Division) is crucial for accuracy
That last point separates amateur drawings from professional ones. Most people draw Saturn with solid rings. Reality is more complex.
Real Saturn has multiple ring sections with gaps between them. The Cassini Division—the space between the A and B rings—is visible even in small telescopes.
When you learn to draw Saturn planet correctly, you’re not just copying shapes. You’re understanding three-dimensional structure, perspective, and astronomical accuracy.
Why Saturn Drawing Skills Matter
You might think, “It’s just a planet with rings.”
But Saturn appears everywhere: science projects, space-themed nurseries, educational materials, tattoo designs, astronomy club logos, and NASA-inspired art.
draw saturn planet to draw it well opens doors. Teachers need accurate reference materials. Parents want to help their kids. Artists need planetary references for sci-fi illustrations.
Plus, learning to draw Saturn planet teaches fundamental art skills: ellipse construction, perspective, shading, and color theory.
The Basic Shapes You Need to Master
Before touching paper, understand Saturn’s geometry.
The Central Sphere (Sort of)
Saturn isn’t a perfect sphere. It’s an oblate spheroid—squashed at the poles due to rapid rotation.
The equatorial diameter is 74,900 miles. The polar diameter is only 67,560 miles. That’s 7,340 miles of difference.
In drawings, this means your circle should be slightly wider than it is tall. The ratio is approximately 10:9.
For a 10-inch-wide planet, make it 9 inches tall. This flattening is subtle but essential for accuracy.
The Ring System
Saturn’s rings extend from 4,000 miles to 50,000 miles above the planet’s equator. They’re incredibly thin—only about 30 feet thick draw saturn planet thousands of miles.
In drawings, rings appear as ellipses. The ellipse shape depends entirely on the viewing angle.
From directly above or below Saturn’s poles, rings look circular. From edge-on, they’re a straight line. Most illustrations show an intermediate angle where rings form moderate ellipses.
The Three-Part Structure
When you draw Saturn planet, think in three layers:
- The back portion of rings (partially hidden behind the planet)
- The planet itself
- The front portion of rings (in front of the planet)
Understanding this layering prevents the flat, pasted-on look that ruins most Saturn drawings.
Seven Step-by-Step Techniques to Draw Saturn Planet

Let me walk you through the exact process I use. This works whether you’re sketching with pencil or creating digital art.
Step #1: Draw the Reference Circle
Start with a light circle using a compass or template. This is your guideline, not the final planet.
If drawing freehand, use light, sketchy strokes. You’ll erase this later.
Make your circle about 10 inches in diameter for practice. Smaller circles make ring details difficult.
Step #2: Flatten the Top and Bottom
Mark points at the top and bottom of your circle, about 10% inward. Draw new curves connecting these points to the sides.
Your planet should now be wider than it is tall—that oblate spheroid shape I mentioned.
This step separates realistic Saturn drawings fromdraw saturn planet planets with rings.
Step #3: Establish Your Ring Angle
Decide the viewing perspective. A 30-degree tilt is classic—rings visible but not overwhelming.
Draw a horizontal centerline through your planet. This represents Saturn’s equator and the plane where rings exist.
From this centerline, sketch light guidelines showing where rings will extend on both sides.
Step #4: Create the Ellipse for Rings
This is where most people struggle. Drawing ellipses freehand is hard.
Here’s my trick: mark four points—left, right, top, and bottom of where your ring ellipse should be. Connect these with smooth curves.
The ring ellipse should extend beyond the planet on both sides. Inner rings pass behind the planet; outer rings pass in front.
For a 10-inch planet, rings might extend to 18 inches in total width.
Step #5: Add the Cassini Division
The Cassini Division is the 3,000-mile gap between Saturn’s A and B rings. It’s dark and visible in photos.
When you draw Saturn planet, place this division about 70% of the way from the inner ring edge to the outer edge.
Draw a second, thinner ellipse inside your main ring ellipse. This creates the gap.
Step #6: Show Ring Shadows
This creates realism. The planet casts a shadow on rings behind it. Rings cast a shadow on the planet beneath them.
Shade the portion of rings that pass behind the planet. Make this area darker, showing the planet blocking sunlight.
On the planet surface, shade a curved band where rings block light. This shadow curves following the planet’s spherical surface.
Step #7: Add Atmospheric Bands and Color
Saturn’s atmosphere has horizontal bands caused by winds and cloud layers. They’re subtle compared to Jupiter’s but still visible.
Draw 3-4 light horizontal lines across the planet. draw saturn planet atmospheric bands.
Color-wise, Saturn is golden-yellow with hints of cream and tan. The rings are light gray-white with the Cassini Division appearing darker.
Here’s a breakdown of techniques by skill level:
| Skill Level | Time Needed | Key Focus | Common Tools |
| Beginner | 20-30 min | Basic shapes, correct proportions | Pencil, compass, eraser |
| Intermediate | 30-45 min | Ring perspectives, shadow placement | Pencils (various grades), blending stumps |
| Advanced | 45-90 min | Atmospheric detail, color accuracy | Colored pencils, markers, digital tablet |
| Professional | 2-4 hours | Photorealistic rendering, multiple moons | Full art supplies, reference photos |
The time you invest when you draw Saturn planet depends on your goals. School projects need less detail than museum exhibits.
Materials and Tools That Make the Difference
The right tools transform your results. Here’s what I recommend based on hundreds of Saturn drawings.
For Pencil Drawings
Essential supplies:
- HB pencil for initial sketches
- 2B pencil for darker lines and shading
- 4B or 6B pencil for deep shadows in the Cassini Division
- Kneaded eraser fordraw saturn planet without damage
- Blending stump for smooth shading on the planet surface
- Compass or circle template for perfect spheres
- Ruler for establishing accurate ring angles
Quality matters. Cheap pencils create grainy, uneven shading. Invest in a decent set like Staedtler or Faber-Castell.
For Colored Drawings
When you draw Saturn planet in color:
- Golden yellow (primary planet color)
- Cream or tan (atmospheric bands)
- Light gray (rings)
- Dark gray or black (Cassini Division and shadows)
- White (highlights on rings and planet)
- Pale blue (subtle atmospheric tints)
Colored pencils work better than markers for Saturn because you can layer colors gradually. Prismacolor Premier pencils are excellent for planetary art.
For Digital Drawing
Digital tools offer advantages:
- Perfect ellipses using shape tools
- Layers for building complexity
- Easy color adjustments
- Undo function for experiments
Programs like Procreate, Adobe Fresco, or even free options like Krita work well.
When you draw Saturn planet digitally, use reference photos at low opacity as a background layer. Trace general proportions, then hide the reference and complete your drawing.
Reference Materials
Always work from references. NASA’s website offers thousands of free, high-resolution Saturn images.
Key photo sources:
- NASA’s Cassini mission archive
- NASA’s Solar System Exploration website
- Hubble Space Telescope galleries
- ESA (European Space Agency) image collections
Different mission photos show Saturn from various angles. Study these to understand how ring appearance changes with perspective.
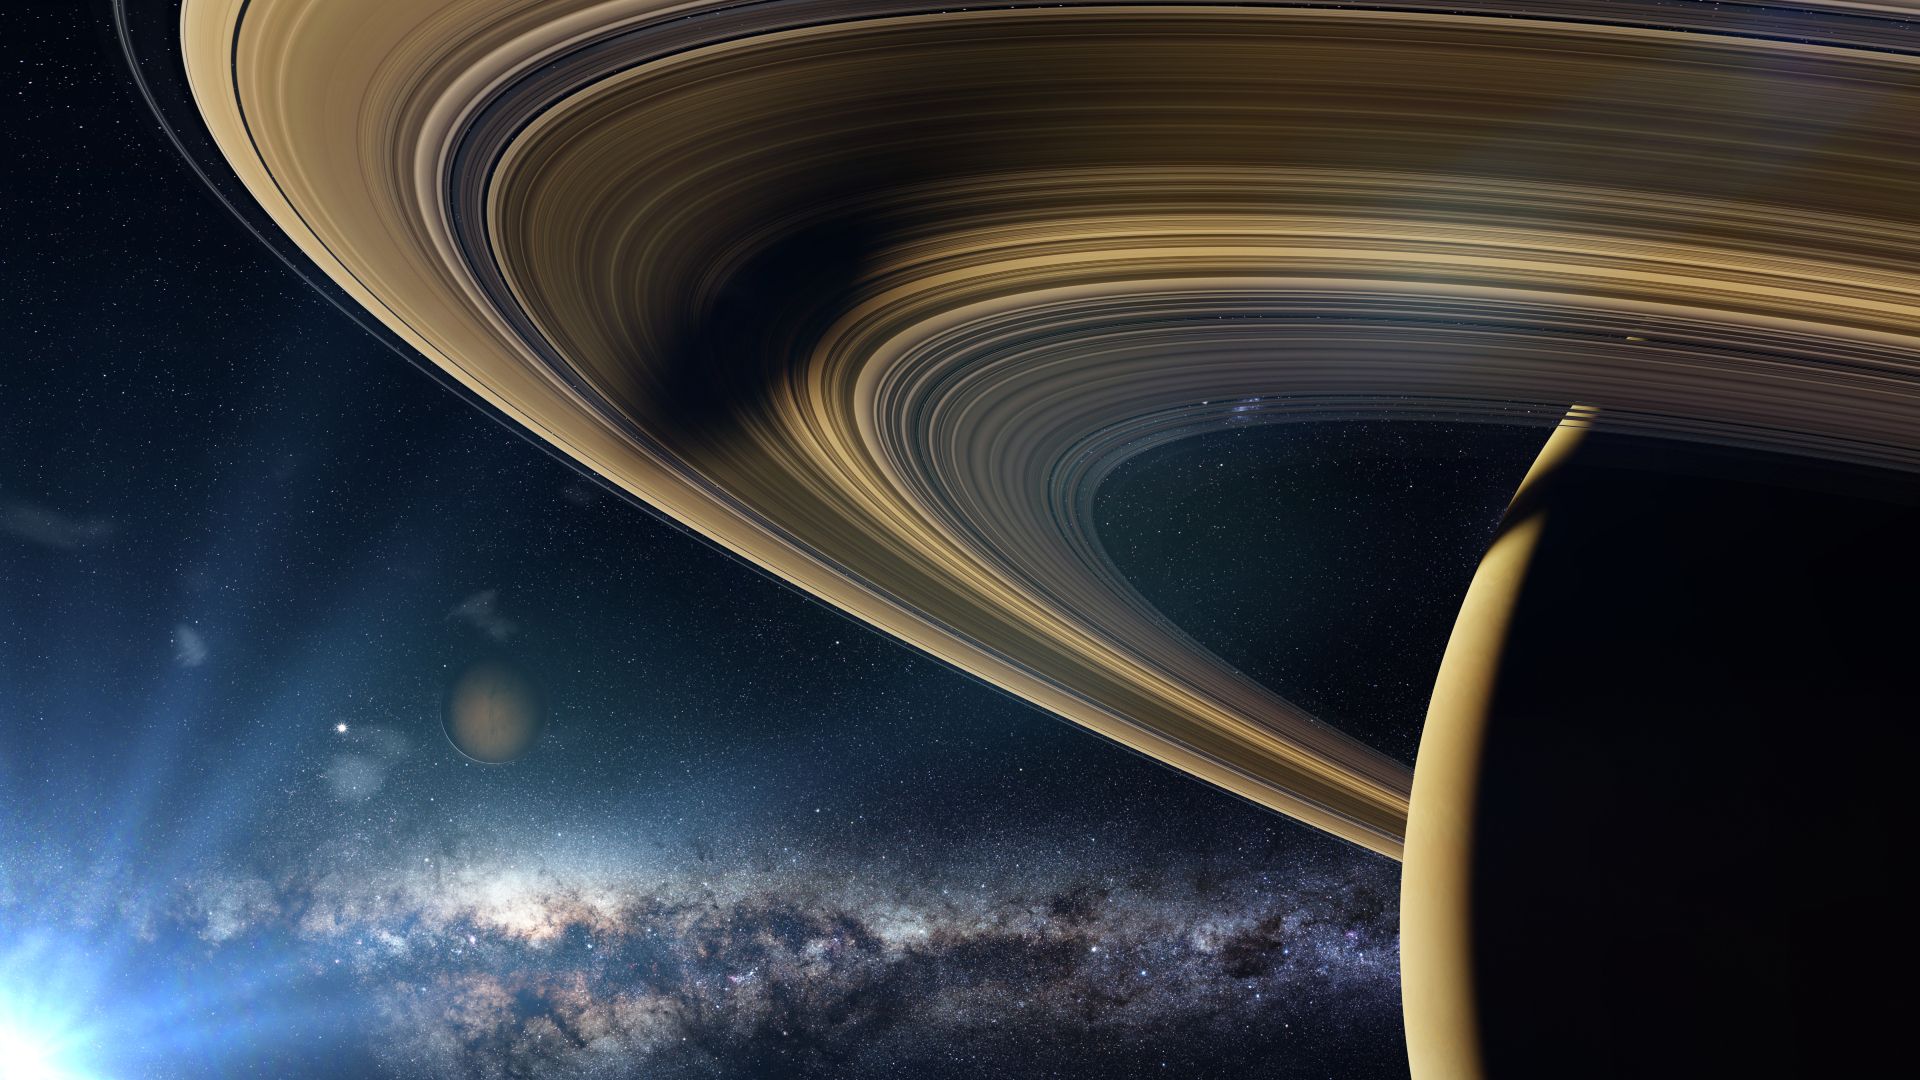
Understanding Ring Perspective and Angles
This is where drawings succeed or fail. Ring perspective is tricky.
The Ellipse Problem
Rings form ellipses at any angle except perfectly edge-on. But ellipses are hard to draw freehand.
Here’s the geometry: if you’re viewing Saturn at a 30-degree angle from the ring plane, the rings form an ellipse with a specific minor-to-major axis ratio.
For most drawings, don’t worry about mathematical precision. Just remember: the more edge-on your view, the flatter (narrower) your ellipse becomes.
Front vs. Back Ring Portions
The rings pass both in front of and behind the planet. This creates the classic Saturn look.
When you draw Saturn planet, the front ring portions are brighter. They receive direct sunlight. Back portions are dimmer because the planet blocks some light.
Also, back portions get partially hidden where the planet overlaps them. Erase the ring lines where they pass behind the planet sphere.
The Shadow Shapes
Two shadows exist:
- Planet shadow on rings: An oval or curved band on the rings behind the planet
- Ring shadow on planet: A curved band across the planet where rings block sunlight
Both shadows curve. They’re not straight lines because you’re dealing with spherical and elliptical surfaces.
The ring shadow on the planet follows the planet’s curvature. It bends across the sphere’s surface.
Practice these shadows separately before adding them to your complete drawing.
What I Learned the Hard Way
I need to be honest about my Saturn drawing journey. It hasn’t been smooth.
My first attempt at teaching someone to draw Saturn planet was for my son’s third-grade science fair. I figured, “It’s just circles and ovals. How hard can it be?”
Very hard, apparently.
I drew a circle. I added rings. It looked like a beach ball with a hula hoop. Completely flat. Zero depth. My son looked at it and said, “That doesn’t look like Saturn.”
He was right.
I’d forgotten everything I knew about perspective, shading, and three-dimensional form. I treated it like a logo instead of a celestial object.
We started over. I pulled up NASA photos and actually studied them. That’s when I noticed the flattened sphere, the ring shadows,draw saturn planet Division, and the atmospheric bands.
Our second attempt took three times longer but looked a hundred times better. My son got an A on his project, and I learned a crucial lesson: reference materials aren’t cheating—they’re essential.
Another embarrassing mistake? I initially drew Saturn’s rings too thick. Real rings are incredibly thin relative to their diameter. I made them chunky, like bracelets.
One teacher who saw my early Saturn drawings asked if I’d drawn a coin on edge behind a ball. That’s exactly what it looked like. Ouch.
I also struggled with ring gaps. My first drawings showed solid rings with no divisions. When an astronomy enthusiast pointed out that visible-gap absence, I realized I was drawing a simplified cartoon version, not Saturn.
The breakthrough came when I studied the draw saturn planet photos for hours. I started noticing details: how ring brightness varies, where shadows fall, how atmospheric bands are subtle waves rather than harsh stripes.
I redrew Saturn fifty times over two months. Each version got slightly better as I incorporated new observations.
The hardest part? Letting go of the “perfect” Saturn image in my head and drawing what actually exists. Saturn is asymmetric, textured, and complex. My early drawings were too clean, too geometric.
When you draw Saturn planet, embrace the irregularities. Real planets aren’t perfect. That imperfection creates realism.
Now when I teach Saturn drawing workshops, I start by showing my terrible early attempts. Students laugh, then feel relieved that even “experts” struggle initially.
The lesson applies beyond Saturn: reference materials, practice, and accepting imperfection are essential for any art form.
Common Mistakes and How to Fix Them
I’ve reviewed thousands of Saturn drawings from students. The same errors appear repeatedly.
Mistake #1: Perfect Circles
Real Saturn is flattened. When you draw Saturn planet, make it wider than tall.
Fix: Measure your vertical and horizontal dimensions. Width should be about 10-11% greater than height.
Mistake #2: Flat Rings
Rings that look pasted on, not wrapping around a sphere.
Fix: Show rings passing both in front of and behind the planet. Erase ring portions hidden by the planet body.
Mistake #3: Missing Shadows
No shadows means no depth.
Fix: Add two shadows—planet shadow on back rings, ring shadow on planet surface. Both should curve naturally.
Mistake #4: Wrong Ring Angle
Rings perpendicular to the planet edge or at unrealistic angles.
Fix: Study reference photos. Most Saturn illustrations show rings at 20-40 degree angles for visual interest.
Mistake #5: Overly Thick Rings
Rings drawn as thick bands rather than thin disks.
Fix: Real rings are extremely thin. Keep ring width proportional—maybe 1/20th the planet’s radius.
Mistake #6: Uniform Ring Color
All rings the same brightness and color.
Fix: Rings have sections. The B ring is brighter. The Cassini Division is darker. Show this variation.
Mistake #7: Ignoring the Cassini Division
Solid rings with no gaps.
Fix: Add the prominent gap about 70% outward from the inner ring edge.
Here’s a troubleshooting guide:
| Problem | Diagnosis | Solution |
| Looks flat | No shadows or depth | Add ring/planet shadows |
| Looks wrong | Perfect circle planet | Flatten top/bottom by 10% |
| Rings look pasted | No integration | Show rings behind planet |
| Too cartoonish | Oversimplified | Add Cassini Division, bands |
| Wrong color | Guessing instead of reference | Use NASA photos for accuracy |
| Proportions off | No measurement | Use ruler, mark key distances |
When you draw Saturn planet and something feels wrong, check this table. Usually it’s one of these issues.
Advanced Techniques for Realistic Saturn Drawings
Once you master basics, push further.
Atmospheric Detail
Saturn has subtle cloud bands, storm features, and color variations. Advanced drawings include:
- Horizontal atmospheric bands (3-5 across the visible hemisphere)
- Slight color shifts from equator to poles
- The hexagonal storm at the north pole (visible in close-ups)
- Occasional white storm spots
These details require careful observation of reference photos.
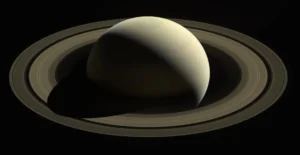
Ring Complexity
Saturn has seven ring groups (D, C, B, A, F, G, E). The main visible rings are C, B, and A.
Advanced drawings show:
- B ring (brightest)
- Cassini Division (dark gap)
- A ring (moderately bright)
- Encke Gap (thin gap in A ring)
You can even show ring transparency where the planet shows through the C ring.
Multiple Moons
Saturn has 83 known moons. Titan (the largest) is often included in drawings.
Add Titan as a small circle near Saturn. It appears golden-orange due to its thick atmosphere.
Smaller moons like Enceladus, Mimas, or Rhea can appear as tiny dots.
Light Source Direction
Professional astronomical art shows consistent lighting. If light comes from the upper left, shadows fall to the lower right.
This affects:
- Ring shadow placement on the planet
- Planet shadow placement on rings
- Atmospheric shading on the planet sphere
- Highlight placement on the rings
Consistent light direction creates cohesion.
Background Elements
Consider adding:
- Star field background (small white dots)
- Distant Sun (small bright circle)
- Spacecraft for scale (Cassini, Voyager)
- Other planets (distant Jupiter or Mars)
These elements create context and scale.
When you draw Saturn planet with advanced techniques, you’re creating scientific illustration-quality artwork suitable for publication or exhibition.
Digital vs. Traditional: Choosing Your Method
Both approaches have strengths. Choose based on your goals and tools.
Traditional Drawing Advantages
Physical media offers:
- Tactile connection to the work
- No technical learning curve
- No software costs
- Original artwork you can frame or sell
- Skills that transfer to all drawing
Traditional works well for quick sketches, teaching environments, and personal enjoyment.
Digital Drawing Advantages
Digital tools provide:
- Perfect geometric shapes (circles, ellipses)
- Layers for building complexity without commitment
- Easy color adjustments and experiments
- Undo function for risk-free learning
- Digital sharing and printing options
Digital excels for detailed, polished work intended for online sharing or reproduction.
Hybrid Approach
Many artists combine methods:
- Sketch Saturn traditionally on paper
- Photograph or scan the sketch
- Import into digital software
- Add color and detail digitally
This approach uses the intuitive nature of paper sketching with digital finishing power.
When you draw Saturn planet, the method matters less than understanding the subject. Master the principles, then apply them with any tool.
Teaching Others to Draw Saturn Planet
Sharing this skill multiplies its impact.
For Young Children (Ages 5-8)
Simplify the process:
- Use circle templates for the planet
- Draw simplified oval rings
- Skip shadow complexity
- Focus on fun colors
Keep sessions to 15-20 minutes. Celebrate imperfect results.
For Older Children (Ages 9-12)
Add complexity gradually:
- Introduce the flattened sphere concept
- Teach basic ellipse construction
- Show simple shadow placement
- Explain the Cassini Division
These students can create recognizable, reasonably accurate Saturns in 30-45 minutes.
For Teens and Adults
Provide full instruction:
- Accurate proportions and measurements
- Proper perspective and ellipse geometry
- Complete shadow mapping
- Color theory and atmospheric detail
Adult learners can achieve near-photorealistic results with practice and patience.
Group Workshop Structure
For classes or groups learning to draw Saturn planet:
Phase 1 (10 min): Show reference photos, discuss Saturn’s features
Phase 2 (5 min): Demonstrate basic shapes on a large surface
Phase 3 (20 min): Guided practice—everyone draws simultaneously
Phase 4 (10 min): Add details and shading together
Phase 5 (5 min): Share results, discuss improvements
This structure keeps everyone engaged and learning at a comfortable pace.
Taking Your Saturn Drawings Further
Once comfortable with basic Saturn, explore variations.
Different Viewing Angles
Draw Saturn from multiple perspectives:
-
- Edge-on view (rings as a thin line)
- Polar view (rings as circles)
- 45-degree angle (classic view)
- Extreme angles showing ring tilt
Each perspective teaches different skills.
Seasonal Changes
Saturn’s rings appear at different angles from Earth as both planets orbit. Over 30 years, rings go from edge-on to maximally open and back.
Research Saturn’s current appearance and draw it accurately for the present year.
Historical Depictions
Study how artists have drawn Saturn through history:
- Galileo’s early sketches (he thought Saturn had “ears”)
- Huygens’ first ring identification (1655)
- Cassini’s division discovery (1675)
- Modern spacecraft photography
Recreating historical views shows how understanding evolved.
Artistic Interpretations
Move beyond realism:
- Stylized Saturn for logos or tattoos
- Watercolor atmospheric Saturns
- Abstract geometric Saturn designs
- Saturn in different art styles (cubist, impressionist, etc.)
When you draw Saturn planet creatively, you merge science and art in unique ways.
Resources for Continued Learning
Deepen your Saturn drawing skills with these resources.
Online References
- NASA Solar System Exploration: Free high-res images
- Cassini Mission Gallery: 400,000+ photos
- ESA’s Saturn Collection: European perspective images
- Astronomy Picture of the Day: Often features Saturn
All are free and in the public domain.
Books
- “Drawing and Painting the Cosmos” by Terry Longhurst
- “The Art of Space” by Ron Miller
- “Celestial Art” by Jeremy Webb
These books teach astronomical art techniques, including planetary drawing.
YouTube Channels
Several channels offer Saturn drawing tutorials:
- “Drawing Space Art”
- “Astronomy Sketch of the Day”
- Various art instruction channels
Search “how to draw Saturn” for dozens of approaches.
Software Tutorials
For digital Saturn art:
- Procreate official tutorials
- Adobe Creative Cloud learning resources
- Krita community guides
These teach software-specific techniques.
Practice Challenges
Set progressive goals:
- Draw five Saturns from different angles
- Create a color Saturn series showing seasonal changes
- Draw Saturn with all major moons labeled
- Create a time-lapse video of your Saturn drawing process
When you draw Saturn planet repeatedly, muscle memory develops. Each drawing becomes faster and more confident.
Conclusion
Learning to draw Saturn planet opens doors to astronomical art, science communication, and creative expression. With these techniques, you’ll create drawings that capture this magnificent world’s beauty and inspire others to look up at the night sky with wonder.
Frequently Asked Questions
1. How do I draw Saturn planet quickly?
Start with a slightly flattened circle and add wide elliptical rings around it.
2. Do I need drawing skills to draw Saturn planet?
No, basic shapes like circles and ovals are enough to draw Saturn planet well.
3. What makes Saturn easy to recognize in drawings?
It has large rings and a slightly flattened planet shape.
4. What colors should I use to draw Saturn planet?
Use pale yellow or golden tan for the planet and light gray or white for the rings.
5. What is the Cassini Division in a Saturn drawing?
It’s the dark gap between Saturn’s main rings.
6. How long does it take to draw Saturn planet?
A simple drawing usually takes 20–30 minutes.
7. What is the hardest part to draw Saturn planet?
Getting the ring shape and perspective correct.
8. Can I draw Saturn planet with a pencil only?
Yes, pencil shading works perfectly for school projects.
Summary
Learning how to draw Saturn planet is easier than it looks because the planet is made of simple shapes—a slightly flattened circle and smooth elliptical rings. By focusing on correct proportions, basic shadows, and the Cassini Division, students can create a clear and recognizable Saturn drawing quickly for school projects.