I’ll never forget my third-grade science project disaster when my saturn planet drawing earned a C-minus because the teacher said my rings “looked like they were glued on as an afterthought.” That crushing moment sparked a fifteen-year journey of understanding what makes Saturn so challenging to draw realistically and what techniques actually work. The problem isn’t talent—it’s knowing the specific tricks that bring this ringed giant to life on paper.
A saturn planet drawing looks most realistic when the rings are drawn as tilted ellipses that pass behind the planet, creating true three-dimensional depth. Using soft shading, subtle atmospheric bands, and pale golden-tan colors helps a saturn planet drawing match real spacecraft images. With the right perspective, accurate colors, and gentle shadows, any saturn planet drawing can go from flat to lifelike.
Learn Saturn planet drawing with easy steps, realistic shading tips, and simple techniques for beginners and artists.
Five Essential Elements Every Saturn Planet Drawing Needs to Look Realistic
Let’s break down the non-negotiable components that separate amateur sketches from impressive artwork.
Most people approach a saturn planet drawing the same way they’d draw any planet: circle, add some rings, done. That’s exactly why most Saturn art looks terrible.
Element 1: Correct Ring Perspective
This is where most saturn planet drawing attempts fail spectacularly.
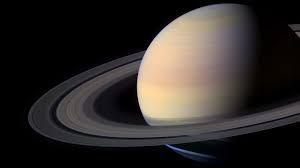
Saturn’s rings aren’t floating circles disconnected from the planet. They’re tilted ellipses that wrap around a sphere, creating a specific 3D perspective that changes based on viewing angle.
Ring perspective basics:
- Rings appear as ellipses (ovals) not circles when viewed at an angle
- Front portion of rings appears wider/closer than back portion
- Rings disappear behind the planet’s sphere
- Ring tilt determines how much of the ring system is visible
When Saturn’s rings appear edge-on (roughly every 15 years), they nearly disappear. When tilted maximally toward Earth, they appear as wide, dramatic ovals.
Element 2: Proper Ring Gaps and Divisions
Saturn’s ring system isn’t a solid disk. It has distinct gaps and divisions that add realism.
Major ring features to include:
- Cassini Division: Large gap between A and B rings
- Encke Gap: Smaller gap within A ring
- Ring brightness variations: B ring (brightest), A ring (medium), C ring (faint)
Even a simple saturn planet drawing should show the Cassini Division—that dark gap between the main rings immediately signals “this artist knows their stuff.”
Element 3: Atmospheric Banding
Saturn isn’t a featureless tan ball. It has subtle atmospheric bands parallel to its equator.
Unlike Jupiter’s dramatic stripes, Saturn’s bands are delicate and low-contrast. They should be suggested rather than boldly rendered—think whisper, not shout.
Element 4: Correct Color Palette
Saturn’s actual colors are much paler than most people expect.
Realistic Saturn colors:
- Planet body: Pale golden-tan, butterscotch, cream
- Rings: White to light gray (A and B rings), rusty brown (C ring)
- Shadows: Soft brown-grays, never pure black
Avoid bright yellows or oranges unless you’re specifically going for an artistic interpretation rather than astronomical accuracy.
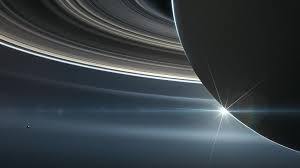
Element 5: Ring Shadow on Planet and Planet Shadow on Rings
This single detail transforms a saturn planet drawing from flat to three-dimensional.
Shadow mechanics:
- Rings cast a curved shadow on the planet’s surface
- The planet casts a curved shadow on the rings
- Shadow position and size depend on Sun angle and ring tilt
- Shadows should be soft-edged, not harsh
| Essential Element | Common Mistake | Correct Approach | Impact on Realism |
| Ring Perspective | Circular rings floating around sphere | Tilted ellipses wrapping around ball | Immediate 3D effect |
| Ring Gaps | Solid ring disk | Cassini Division visible | Professional detail |
| Atmospheric Bands | No bands or overly dramatic | Subtle, low-contrast stripes | Authentic appearance |
| Color Palette | Bright yellow/orange | Pale golden-tan/cream | Scientific accuracy |
| Shadows | No shadows or wrong placement | Ring shadow on planet, planet shadow on rings | Depth and realism |
Understanding these five elements provides the foundation for any successful saturn planet drawing regardless of your skill level or chosen medium.
Seven Step-by-Step Techniques for Drawing Saturn’s Rings Correctly
The rings make or break your saturn planet drawing. Here’s exactly how to get them right.
Step 1: Draw the Planet Sphere First
Always start with the planet body before adding rings.
Use a compass, trace a circular object, or freehand a circle depending on your skill level. The planet should be your anchor point—everything else relates to it spatially.
Step 2: Determine Your Ring Tilt Angle
Decide how tilted Saturn’s rings appear in your drawing.
Ring tilt options:
- Minimal tilt (5-15°): Rings appear thin, nearly edge-on
- Moderate tilt (30-45°): Balanced view showing both planet and ring detail
- Maximum tilt (20-27°): Rings appear widest, most dramatic
Most effective saturn planet drawing compositions use moderate to maximum tilt because it showcases both the planet and ring system impressively.
Step 3: Establish Ring Ellipse Construction
Draw two ellipses (ovals) representing the inner and outer ring boundaries.
Construction method:
- Find the planet’s center point
- Draw two ellipses sharing the same center
- Ellipse width determined by ring tilt angle
- Inner ellipse should leave visible space around planet
- Outer ellipse defines ring system’s extent
Step 4: Erase Hidden Ring Portions
Rings pass behind the planet—this hidden portion must be removed.
Carefully erase the ring ellipse sections that would be blocked by the planet sphere. This creates the illusion of rings wrapping around a three-dimensional ball rather than floating in front of it.
Step 5: Add the Cassini Division
Draw a third ellipse between your inner and outer ring boundaries.
This gap between Saturn’s A and B rings should be:
- Consistent width all around
- Following the same elliptical curve as other rings
- Slightly wider than you think (it’s prominent in photos)
Step 6: Create Ring Shadow on Planet
Draw a curved shadow cast by the rings onto Saturn’s surface.
Shadow placement:
- Appears on the side opposite the light source
- Curves following the planet’s spherical surface
- Width matches the ring system width
- Soft edges, gradual transition
Step 7: Add Planet Shadow on Rings
Draw the shadow cast by the planet onto the rings.
This shadow:
- Appears on the ring portion behind the planet
- Curves following the ring ellipse
- Darker near the planet, lighter as it extends
- Creates dramatic depth
Advanced ring technique:
For expert-level saturn planet drawing, vary ring brightness. The B ring is brightest, the A ring slightly dimmer, and the C ring (innermost) appears faint and translucent. This variation adds photographic realism.
The Color Theory Behind a Realistic Saturn Planet Drawing
Getting Saturn’s colors right separates amateur work from professional-quality saturn planet drawing.
Saturn’s Actual Color Palette
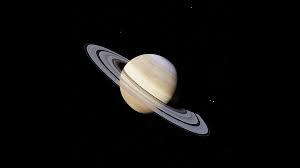
Saturn appears pale golden-tan to butterscotch in true-color photography.
Why Saturn isn’t bright yellow:
Most textbook illustrations show Saturn as bright yellow or orange. This is scientifically inaccurate—these are enhanced-color images where scientists boost saturation to reveal atmospheric features.
True-color Saturn photos from Cassini, Hubble, and other sources show:
- Soft cream or light tan base color
- Subtle golden hue
- Delicate peach or butterscotch tones
- Very low saturation compared to Jupiter
Ring Color Variations
Saturn’s rings aren’t uniform white—they have subtle color variations.
Ring system colors:
- A Ring (outer main ring): Light gray to white
- Cassini Division (gap): Appears dark, nearly black
- B Ring (middle main ring): Brightest white
- C Ring (inner ring): Darker, brownish-gray, semi-transparent
Color Mixing for Traditional Media
For colored pencils, markers, or paints:
Planet body recipe:
- Start with light tan or beige base
- Add tiny amounts of yellow (less than you think)
- Mix in subtle peachy or golden undertones
- Keep everything very pale and unsaturated
Ring recipe:
- Primarily white or light gray
- Slight warm tone (barely noticeable cream)
- Avoid pure blue-white (too cold)
Digital Color Codes
For digital saturn planet drawing:
Planet colors:
- Base: #F4E7D7 or #EBD9C5
- Shadows: #D4C4B0
- Highlights: #FFF8F0
Ring colors:
- A Ring: #E8E8E0
- B Ring: #F5F5F0
- C Ring: #A8987C
- Cassini Division: #2A2520
Atmospheric Band Colors
Saturn’s subtle bands should be barely darker than the base color.
Band coloring:
- Use the base color plus 5-10% darker value
- Slight increase in saturation for belts
- Warm brown tones for darker features
- Cool undertones for lighter zones
| Color Element | Avoid | Use Instead | Why |
| Planet Body | Bright yellow/orange | Pale golden-tan/cream | Matches true-color photos |
| Rings | Pure white or gray | Warm off-white/cream | Realistic appearance |
| Shadows | Black or dark gray | Soft brown-gray | Atmospheric scattering |
| Bands | High contrast stripes | Subtle, low-contrast | Saturn’s actual appearance |
Understanding color theory elevates your saturn planet drawing from cartoonish to photorealistic.
Materials and Tools for Different Saturn Planet Drawing Styles
The right materials dramatically affect your final result.
Pencil Drawing Approach
Graphite pencils work beautifully for monochrome saturn planet drawing.
Recommended pencil range:
- 2H or H: Initial construction lines, ring outlines
- HB: Base planet shading, mid-tones
- 2B: Atmospheric bands, medium shadows
- 4B or 6B: Darkest shadows, Cassini Division
Pencil technique:
- Use circular strokes for planet shading
- Follow ring curves with directional strokes
- Blend with paper stumps or tissue
- Leave highlights bright for 3D effect
Colored Pencil Approach
Colored pencils offer control and blend-ability for realistic saturn planet drawing.
Essential colors:
- Cream or sand
- Light tan or beige
- Pale yellow
- Light gray
- White (for highlights and ring brightness)
- Soft browns for shadows
Layering technique:
- Start light, build gradually
- Layer multiple colors for depth
- Circular strokes for smooth planet surface
- Directional strokes following ring curves
Digital Drawing Software
Digital tools offer unmatched flexibility for saturn planet drawing.
Software options:
- Procreate (iPad): Excellent brushes, intuitive
- Photoshop: Professional standard, steep learning curve
- Krita: Free, powerful alternative
- Clip Studio Paint: Great for illustration
Digital technique:
- Work in layers (planet, rings, shadows separate)
- Use soft airbrush for gradient shading
- Hard-edged brush for ring boundaries
- Adjustment layers for color corrections
Watercolor Approach
Watercolor creates soft, atmospheric saturn planet drawing with unique character.
Watercolor challenges:
- Hard to create crisp ring edges
- Difficult to preserve bright highlights
- Color control requires practice
Solutions:
- Use masking fluid for ring edges
- Leave white paper for brightest areas
- Very diluted washes for pale colors
- Wet-on-dry for controlled bands
Mixed Media Combinations
Combining materials often yields the best results.
Effective combinations:
- Pencil sketch + colored pencil color
- Watercolor base + colored pencil details
- Digital base + traditional texture overlays
- Graphite + white gel pen highlights
Common Saturn Planet Drawing Mistakes and How to Fix Them
Let’s identify and correct the errors that ruin most Saturn artwork.
Mistake 1: Circular Rings Instead of Elliptical
This is the #1 killer of saturn planet drawing realism.
The problem: Rings drawn as perfect circles appear to float in front of the planet rather than wrapping around it in 3D space.
The fix:
- Always draw rings as ellipses (ovals) when showing any tilt
- The more tilted Saturn’s axis, the flatter the ellipse
- Use an ellipse guide or template if needed
- Check that both ring edges follow the same elliptical curve
Mistake 2: No Ring Shadow on Planet
Missing this shadow makes your drawing look flat and amateurish.
The problem: The rings cast a prominent curved shadow on Saturn’s surface that’s visible in every real photo.
The fix:
- Determine light source direction
- Draw a curved band shadow on the opposite hemisphere
- Make shadow follow the planet’s spherical curve
- Soften shadow edges (not sharp lines)
- Shadow should be dark but not pure black
Mistake 3: Uniform Ring Brightness
Real Saturn rings have distinct brightness variations.
The problem: Drawing all rings the same brightness ignores the dramatic contrast between different ring sections.
The fix:
- B ring (middle): Brightest section
- A ring (outer): Slightly dimmer
- Cassini Division: Very dark gap
- C ring (inner): Faint, semi-transparent
Mistake 4: Overly Dramatic Atmospheric Bands
Many artists make Saturn look like Jupiter’s twin.
The problem: Saturn’s atmospheric banding is extremely subtle compared to Jupiter—high-contrast stripes look wrong.
The fix:
- Keep band contrast very low (5-15% darker than base)
- Use soft edges that blend into surrounding atmosphere
- Fewer bands than you think (maybe 3-5 visible)
- Horizontal bands parallel to equator
Mistake 5: Wrong Proportions
Saturn’s rings have specific proportional relationships to the planet.
The problem: Rings too wide, too narrow, too thick, or too thin destroy realism.
The fix:
- Ring outer diameter: approximately 2.3× planet diameter
- Ring inner edge: leaves visible gap around planet
- Ring thickness: very thin (1/1000th of width in reality)
- Cassini Division: about 1/10th of ring width
Mistake 6: Harsh, High-Contrast Shadows
Saturn’s thick atmosphere creates soft, diffused shadows.
The problem: Sharp-edged shadows with pure black look unrealistic.
The fix:
- Soft, gradual shadow transitions
- Brown-gray shadow colors, not pure black
- Atmospheric scattering prevents total darkness
- Gentle gradient from light to shadow
| Common Mistake | Why It Fails | Quick Fix | Improvement Impact |
| Circular rings | Destroys 3D illusion | Draw ellipses instead | Massive |
| No ring shadow | Appears flat | Add curved shadow on planet | Huge |
| Uniform ring brightness | Ignores real structure | Vary brightness by ring section | Significant |
| Dramatic bands | Wrong planet character | Very subtle, low-contrast | Moderate |
| Wrong proportions | Looks off | Check ring diameter ratios | Significant |
Avoiding these mistakes immediately elevates any saturn planet drawing from amateur to competent.
What I Learned the Hard Way About Drawing Saturn
That third-grade C-minus haunted me for years.
Mrs. Henderson’s comment about my “glued-on hula hoop” rings devastated nine-year-old me. I’d worked so hard on that project, spending hours coloring Saturn bright yellow with orange stripes like my textbook showed.
The rings were perfect circles. The planet was a perfect circle. Everything was perfectly… wrong.
My critical mistakes:
- Error 1: Copying textbook illustrations instead of photos Textbooks often show simplified, diagrammatic Saturn with exaggerated colors and features. I should have looked at actual Voyager and Hubble images.
- Error 2: Drawing rings as separate circles I literally drew the planet, then drew rings around it as if they were floating hoops. No perspective, no 3D integration, no understanding of ellipses.
- Error 3: Using bright, saturated colors My bright yellow planet with orange stripes looked more like Jupiter than Saturn. I didn’t understand that Saturn’s real colors are pale and subtle.
- Error 4: No shadows anywhere No ring shadow on the planet. No planet shadow on the rings. Just flat shapes with zero depth or dimension.
The redemption arc:
In tenth grade, I had another chance. Advanced art class, choose-your-own project, and I chose a saturn planet drawing to prove I could do it right.
What I did differently:
- Researched real images: Studied dozens of Cassini mission photos
- Understood ring perspective: Learned about ellipses and 3D projection
- Practiced shadows: Spent hours just drawing spheres with cast shadows
- Used accurate colors: Pale tans and creams, not bright yellows
- Added subtle details: Faint atmospheric bands, ring brightness variations
The result wasn’t perfect, but it was real. It looked like Saturn, not a cartoon.
The deeper lessons:
- Reference photos beat simplified diagrams: Real imagery teaches real technique
- Understanding beats copying: Know why rings appear elliptical, don’t just memorize it
- Shadows create dimension: Light and shadow transform flat drawings into 3D forms
- Subtle beats dramatic: Saturn’s beauty lies in delicacy, not contrast
- Failure motivates improvement: That C-minus drove me to actually learn
The emotional payoff:
When I showed Mrs. Henderson my tenth-grade saturn planet drawing, she remembered my third-grade disaster. “Now that’s Saturn,” she said. “See what happens when you understand what you’re drawing?”
That validation meant more than any grade.
Digital vs. Traditional Saturn Planet Drawing Techniques
Both approaches have unique advantages for creating saturn planet drawing artwork.
Digital Advantages
Non-destructive editing:
- Try different ring angles without starting over
- Adjust colors globally with one click
- Move elements around to improve composition
- Undo infinite times
Layer workflow:
- Planet body on one layer
- Rings on separate layer
- Shadows on their own layers
- Adjustment layers for color correction
Precision tools:
- Perfect ellipses with ellipse tool
- Symmetrical rings using transform tools
- Gradient tools for smooth shading
- Selection masks for clean edges
Digital workflow for saturn planet drawing:
- Sketch basic composition
- Create planet sphere on separate layer
- Add ring ellipses on layer above
- Erase hidden ring portions
- Create shadow layers
- Add color with adjustment layers
- Add atmospheric bands
- Refine details and blend
Traditional Media Advantages
Tactile experience:
- Physical connection to artwork
- Unique textures impossible digitally
- Original artwork you can frame
- No screen time required
Happy accidents:
- Unexpected blending creates interest
- Texture variations add character
- Imperfections feel human and authentic
Skills development:
- Forces better planning (can’t easily undo)
- Develops hand-eye coordination
- Teaches color mixing physically
- Builds patience and commitment
Traditional workflow for saturn planet drawing:
- Light pencil sketch of composition
- Establish planet sphere carefully
- Draw ring ellipses with precise curves
- Erase construction lines
- Block in base colors
- Add shadows with gradual layering
- Build up atmospheric details
- Add highlights and final touches
Hybrid Approach
Many professional artists combine both methods for saturn planet drawing.
Effective hybrid workflows:
- Sketch traditionally, scan, finish digitally
- Create digital base, print, add traditional texture
- Traditional painting with digital color correction
- Digital sketch as reference for traditional final
Which approach for beginners?
Start traditional if:
- You have basic art supplies already
- You prefer physical materials
- You want to learn fundamental skills
- Budget is limited
Start digital if:
- You have tablet/computer access
- You value experimentation freedom
- You want fastest learning curve
- You plan to share work online
Both paths lead to successful saturn planet drawing—choose based on your preferences, resources, and goals.
Creating Saturn at Different Skill Levels
Tailored approaches for beginners through advanced artists.
Beginner Level (First Saturn Drawing)
Goals:
- Understand basic ring perspective
- Create recognizable Saturn
- Learn fundamental shading
- Build confidence
Simplified approach:
- Draw planet as perfect circle
- Add moderate ring tilt (easier than extreme angles)
- Include only Cassini Division (skip minor gaps)
- Use simple shading (light source from upper left)
- Monochrome or limited color palette
Time commitment: 30-60 minutes
Beginner saturn planet drawing checklist:
- Planet is circular and centered
- Rings are elliptical, not circular
- Cassini Division is visible
- Ring shadow appears on planet
- Planet appears three-dimensional
Intermediate Level
Goals:
- Add atmospheric detail
- Master multiple ring divisions
- Improve color accuracy
- Develop personal style
Enhanced approach:
- Include subtle atmospheric bands
- Show A, B, and C rings with brightness variations
- Add both ring shadow and planet shadow
- Use realistic pale colors
- Experiment with viewing angles
Time commitment: 1-3 hours
Advanced Level
Goals:
- Photorealistic rendering
- Complex lighting scenarios
- Environmental context
- Professional presentation
Advanced techniques:
- Multiple subtle atmospheric features
- All major ring divisions and gaps
- Encke Gap and other fine details
- Advanced color theory (reflected light, atmospheric scattering)
- Environmental elements (stars, moons, spacecraft)
Time commitment: 4-10+ hours
| Skill Level | Key Features | Main Challenge | Success Metric |
| Beginner | Basic ring perspective, simple shading | Making rings look 3D | Recognizable as Saturn |
| Intermediate | Atmospheric bands, ring divisions | Color accuracy, subtle details | Looks realistic from distance |
| Advanced | Photorealistic detail, complex lighting | Time investment, precision | Could mistake for photograph |
Progress through these levels at your own pace—every saturn planet drawing improves your skills.
Conclusion
Your saturn planet drawing doesn’t have to be perfect—it just needs to show you understand how rings wrap around a sphere, how shadows create depth, and how subtle colors capture this gas giant’s true beauty. Start simple, practice ring perspective relentlessly, and remember that every professional artist’s first Saturn looked terrible. What matters is that each attempt teaches you something new about bringing this magnificent ringed world to life on your page.
Frequently Asked Questions
1. What is the hardest part of a Saturn planet drawing?
The most difficult part is drawing the rings in correct three-dimensional perspective using ellipses instead of flat circles.
2. Why do Saturn’s rings look wrong in beginner drawings?
Beginners often draw the rings as full circles that don’t pass behind the planet, making the drawing look flat and unrealistic.
3. What materials are best for a beginner Saturn planet drawing?
Graphite pencils (HB–4B), smooth paper, an eraser, and blending tools are ideal for learning form and shading.
4. Can beginners add color to a Saturn planet drawing?
Yes, colored pencils work best because they allow light layering and easy correction.
5. How do I draw Saturn’s rings at the right angle?
Draw two concentric ellipses centered on the planet, then erase the parts hidden behind the planet to create depth.
6. What colors are most accurate for Saturn?
Use pale cream, light tan, and soft golden tones—avoid bright yellow or orange.
7. How long does a good Saturn planet drawing take?
A simple drawing takes 30–90 minutes, while detailed work may take several hours.
8. Is digital drawing good for Saturn illustrations?
Yes, digital tools make it easier to adjust ellipses, shading, and colors using layers and undo options.
Summary
A realistic Saturn planet drawing depends on correct ring perspective, subtle shading, and accurate pale colors rather than dramatic contrast. The rings must be drawn as ellipses that pass behind the planet, with soft shadows to create depth. Beginners should start with simple pencils or colored pencils, focusing on form and light before adding detail. With practice and reference images, artists can progress from basic sketches to detailed, realistic Saturn illustrations over time.